Showing posts with label Project Tutorials. Show all posts

Monday, February 6, 2017

{DIY} Custom Sized Headboard From Twin Bed

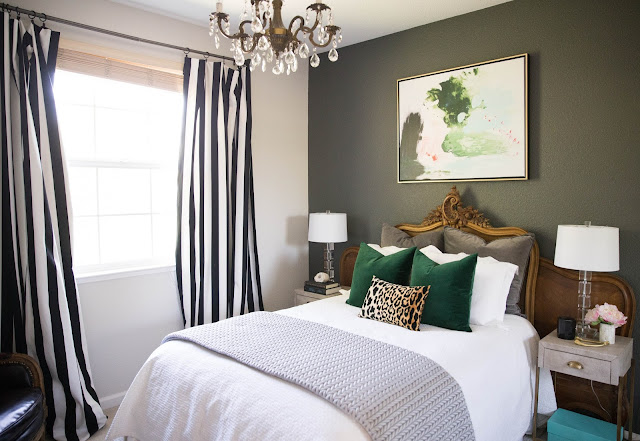
For some reason, my bedroom is consistently the last space in my home that I finish. I believe it is because I am so used to moving, that I try to get the areas in my home that I will be entertaining in completed first.     
Since I have been renting the same place, my loft, for a couple of years now and I plan on staying here for a bit. Now, I finally finished my bedroom, and oh boy, it is so important to have a "finished" and peaceful place to sleep, shut down and unwind in...Let's be real, in my home, a room is always a work in progress. I am loving the bold mix of modern with ultra traditional.                          
I scored this 100 year old, Louis XV, twin headboard in France for $100 right before leaving Germany, and finally had my master plan for this piece executed. Since I won't be having kiddos anytime in the near future and larger European bed sizes don't convert to our American bed sizes, I decided I would butcher this gorgeous thang and give it new life. I am typically not a fan of modifying antiques but knew this bed would get FAR more use and would be appreciated and honored more if I did cut it, than if it just sat in my garage, waiting for a kid to come along who wouldn't appreciate it's beauty as much as I would anyhow. Sorry (not sorry), future, unborn child.

I want to encourage you guys to not be limited by what/how you "should" be using an item for but to re-imagine or re-engineer how a piece can evolve and be used. I only have a full mattress at the moment and wanted this headboard to fit that but to also potentially fit up to a king sized bed in the future. In order to make that happen, us antique-loving, Europe living expats have been known to slice a twin footboard in half and mount each half to either side of the headboard. It makes for a ridiculously dramatic bed and at a stupid-cheap price. The best part about it, is it looks great with ANY size bed and is totally custom and unique looking. 
Thankfully, my footboard had a line down the middle, so it was an easy line to cut on. This is helpful for lazy folks. 
In order to make it as flush with the headboard as possible, I had the moulding on the back of the headboard's feet cut off vertically. 
By the way, do you ever wonder why fake antiques have all the little holes in them? It is trying to emulate the wood worm damage in real antiques as seen below, to make it look more authentic. Wood worm is not a good thing and will shred your gorgeous wood. This piece along with all my antiques were treated before bringing it back to the U.S.
 In order to attach your footboard halves to the headboard, you will flip your headboard over and mount each half to either side (from the back). This will make the centerpiece protrude a little bit more but it adds a dramatic effect. These were attached with long screws. 
 The finished product is stunning. I like the look of having the nightstands in front of the extra large headboard as it gives it a "hotel look". When I eventually get a king bed, I will mount the headboard higher on the wall and know it will look spectacular. This incredibly, inexpensive headboard is quite possibly one of my favorite pieces of furniture in my home. 


As you can see from my coffee bar armoire, I like to do unexpected things with my antiques and use them in ways that are totally different and unassuming. If you missed my Christmas decor (which you totally did because I was ultra late posting pics, because of a technical problem), click the image below!                                      
I want to thank Rachel and Ari from Ari and Faye Photography, for taking these beautiful images of my bed!
I am off to sip some coffee and get more work done. So tell me, dear friends...What pieces in your home can be reworked or reimagined??

Saturday, September 17, 2016

Ultra Creamy, Uber Delectable and Customizable Coffee Creamer


Guten Tag, my friends! If you follow me on instagram, you'll know that since I don't have adorable kiddos to post pictures of everyday, I share pictures of my adorable coffee. Yes, yes I know, some of you may think it's a little lame and sad, but I think it's a little awesome...I love my coffee and I love religiously going to my coffee bar armoire to whip up a delectable drink I enjoy relaxing with it by my (ahem...faux) fire. It is my "me" time.
I wanted to share my favorite, ultra delish, ultra creamy, coffee creamer recipe that you can make from home and is totally customizable. Anytime I serve it to guests, they ask me what it is and 90% of the time they never need to add extra sugar because it is delicious on it's own even through it contains no sugar or sweeteners! Get ready for the most embarrassingly simple recipe ever. On a sidenote, besides my IG photo above, all these shots were taken by my super talented lady friends, Ari and Faye of Ari and Faye Photography! So grateful to have these shots and to share some more with you throughout the next few posts!! 
 To make a batch of this customizable and natural creamer, you simply combine:

~ 2-1/2 Cups unsweetened almond milk (I enjoy the vanilla almond milk)
~ 2 Cups heavy whipping cream
~ 1-2 vanilla bean(s) scraped out into the cream, vanilla extract or any other extract (start with a Tbs. and add more to your liking). If you choose to use the vanilla bean instead of the extract, you can leave it in your cream and it will become deliciously more flavorful over the next couple days. Other extracts that I enjoy are pumpkin pie spice extract, butter and rum. Sometimes I will mix all of the above with pumpkin pie spice (found in your spice section) and it tastes remarkably like egg nog without all the sugar. 
 Mix it up, play around with the recipe and tell me what different variations you come up with! I would love feedback on how you liked this! Now I am off to tear apart all the Fall decor I just set up, because I realize I never shared a post with you on my totally updated loft with my new furniture additions. After I shoot all that, I will be setting all the fall goodies up again. I am tired just thinking about it! Good thing I have coffee to help keep me perked up and peppy!


Thursday, April 7, 2016

Espresso Bar Armoire Part 3: Installing a Chandelier in an Armoire


As you know, I recently converted an armoire into a quaint, tucked away espresso bar. Click here to read parts one and two. This is part three...Installing a light fixture. If you are lazy and don't like overly involved projects, this is the project for you...
This "tutorial" is so insanely easy, I almost feel guilty writing an entire post that is dedicated to doing this, but alas I shall. There is something so enchanting about opening an armoire that is converted into a unique space that has a glistening little chandelier or awesome light that establishes the petite area as a place of importance or "retreat". The best part is, it is SOOOO incredibly simple to do.

Step One: Convert Your Chandelier Into a Plug-In Light (and of course, drink a yummy iced coffee while you do it!)

You are essentially turning your hanging light fixture into a lamp. There are tons of light kits that you can purchase (at any hardware store) and plenty of sites that give tutorials and instructions. I am no electrical expert, so please follow the directions on the light kit. I am not responsible for someone not doing this step correctly. If you can't figure it out, ask an electrician or purchase a "plug in" light fixture. These are available at a plethora of retailers, including Cost Plus World Market, Ikea, Pier One, and dozens more.


I kind of want to have a "laying" chandelier table lamp in my home... I may have to do another one like this. I love the look.

Step Two: Drill Your Hole

Using a 1-1/2" drill bit, drill a hole in an inconspicuous space in your armoire. I saved the little piece of wood to pop back in if I ever decided I didn't want to run electricity into my armoire anymore. I also drilled a hole in the same spot on my removable wallpaper backdrop so they line up. 

Step Three: Hang Your Light on a Hook

Yep... That easy. twist a hook into the ceiling of your armoire and hang your light.

Step Four: Plug Your Light in and Run it Through The Hole You Have Just Drilled


You can hide your cord by running it along the inside of your armoire or behind the replaceable back panel that I show you how to make, here.

Step Five: Stand Back and Look at Your Lovely Little Space in "Awe"!

A dazzling or unique small  light fixture is an unexpected touch that will add character, charm and dimension to your little space, whatever it may be.

Note: Do not leave your light on while doors of armoire are closed. You can purchase switches that allow you to click it on when you open your doors. Too much heat in a small space can cause a fire if left on. I am not responsible for any problems that may occur if this is executed incorrectly.

I am off to chug a ton of coffee and work on a remodel here in San Francisco! Let me know how this works for you! Ciao, friends!

Thursday, March 10, 2016

Espresso Bar Armoire Part Two: Installing DIY Removable Wallpaper Backdrop


When you open your armoire, closet or drawers, does it's blandness get you down?? Do you feel like you are staring into a dark pit of "meh"?? (Don't worry, I am not about to start an advertisement for furniture anti-depressants...) I don't know about you all, but I like to feel a bit jolted and stoked when I open a cupboard door. My faux, fawn hide wallpaper is such a delightful eye treat every morning, I kinda wanna wallpaper or mural every cupboard and closet in my home. It adds the perfect amount of sass to the French armoire I brought home from Europe. 
This is part two to my espresso bar armoire redo, in case you were wondering what I am jabbering about. You can read about it and see some other "before" and "afters" by clicking here.

This is the stink-face I made when I opened my armoire before the redo...

In case you forgot what this armoire looked liked before I adorned it with a gorgeous wall-paper from Walls Republic, check out this photo below...
Madame Brun Armoire was a frumpy lady indeed!
I decided I wanted to wallpaper the back, but I surely didn't want to mess with the integrity of this gorgeous old piece... While this wallpaper is classic and timeless, I change my style on occasion and I didn't want to mess with the wood on the back panels. The best way to do this was to create a removable, pop-in back wall, that I could switch out or replace any time my heart desired. I also want to be able to get other wallpapers from the incredible selection at Walls Republic so I can swap out the backdrop for different purposes or entertaining occasions. I may want this to be a wine bar or hide-away Bier Garten at my next dinner party and can swap the backdrops in and out accordingly! I also wanted it to be able to slide into place and sit still without, nailing, drilling, gluing or screwing a back panel in my armoire. 
Lucky for me, my friendl Drew (a super awesome and talented construction project manager) came to the rescue and helped me figure out a way to accomplish this goal! What a wizard he is indeed! We created this template below, using old bags, and traced the top of the inside of the armoire. 


 We traced that pattern onto a piece of wood that was 4'x8' and 1/16" thick and cut it out with a jig-saw. 

We slid it in and made adjustments till if fit like a glove....
I mounted the wallpaper to the wood with spray adhesive and wrapped it around the back, so that the edges wouldn't lift. I popped it in, slid the shelf in and Bam! Shazaam! Kapow! I now had a gorgeous, wall-papered armoire! 
In case you forgot what it looked like before.....

.....and here it is now!

I am completely IN LOVE!
Next, I will be sharing with you how I installed my chandelier and where I hid all my cords to my espresso machine and light fixture! To read more on the transformation of this armoire, click here!

I want to thank Walls Republic for the fabulous paper and Drew for helping me make it happen! 

Stay tuned my friends! 

Tuesday, February 9, 2016

Fawn-Hide Wallpaper and a Tucked Away European Cafe


One of my absolute favorite things about living in Europe, was visiting quaint, little cafes in Germany and France. There is something so unique, special and endearing about a "folk" looking cafe or bistro in Bavaria or the French Alps that is warming to the heart and "oh, so comforting" to the soul. There really is nothing like it in the world. Many are laden with antlers, folk painting, oil paintings, wood beams and paneling, and of course, mouth watering coffee and pastries. 
When I moved back home from Europe and into my petite loft, I needed to utilize every inch of my place so that my home could store all my goodies, look good and most importantly, be functional. I needed a place to hook up my espresso machine and coffee bar and the Louis armoire that I found in France, was the perfect piece to create a tucked-away French/ Bavarian fusion cafe. When I open its doors, I feel swept away to a little "folk" coffee shop in the European countryside. It's a great centerpiece for entertaining as well!

I came across this gorgeous and incredibly real looking faux, fawn hide wall-paper from Walls Republic and I knew that I needed to use it somewhere in my home. It is unique, classic, timeless and reminded me of something I would have seen in the German Alps. You guys, you seriously would not believe the quality of this stuff. It is heavy, textured and looks absolutely real in person. Walls Republic sent me a few samples of the coverings that I liked and I absolutely fell in love with the fawn hide (along with the other four samples that I am madly searching for a place in my home to utilize).  To my surprise, when the wallpaper arrived, it said it was "made in Germany"! I was so elated! Not only did it have the look that I was going for and appeared completely authentic, but it was also from the magical land of adorable cafes! 

And here is the after! Look at what a difference the wall-paper makes!


This print looks awesome with all of my vintage and folk pieces that I brought back, but I am also looking forward to styling it with some clean, modern accessories in the future to switch up the look. 

I wanted to line the inside of my armoire with this stunning paper without ruining the integrity of the armoire, so I will be sharing with you how I created this semi-permanent design without touching the wood. I would love to eventually get a few different papers so that I can swap the backing or "backdrop" of my cabinet in and out and I can use my armoire for all different things and I can adjust this accent wall as the seasons (and my tastes) change. 

Yes, that's a super studly German dog, wearing a hat and smoking a pipe with a fox on it...

Even if you can't afford an entire room or wall in a fabulous, high quality wallpaper, you really should consider using it on an accent wall, niche or piece of furniture to add richness, texture and interest to your space. I was blown away by the quality and by the wonderful customer service that was provided by Walls Republic. The pictures of their items online don't do justice... you really need to get some samples for yourself! Not only does it look and feel great but it was easy to match the seams and it didn't show any bubbles or air pockets because it is so thick and textured. I am definitely putting the remnants to good use as well, and I can't wait to show you 
what I have in store for that!


I never imagined that wall paper could cure my intense homesickness for my little German Barn and village, but it does the trick. My tucked-away espresso bar is a great little spot to drift away, get inspired and start my mornings off right. I can't wait to entertain and open its enchanting doors to take my guests to a "storybook" cafe, like the ones I cherished while living abroad. I can almost smell crepes and hear accordion music when I enter this lovely little space (probably because I have French accordion playing on my playlist and a constant craving for Nutella Crepes). Do yourself a favor and check out Walls Republic and all the awesome papers they have to offer, you won't be disappointed. 


Stay tuned for more posts on how to make a space like this in your home! Tutorials and DIY's coming this week! 

In case you missed it, click here to read about what I have been up to!
I am off to enjoy some coffee! 
Tchüss!

Related Posts Plugin for WordPress, Blogger...