Tuesday, November 19, 2013

Our Re-designed Living Room


I know, I know... I am a bit nuts-o...what's new? I have changed this room a bazillion times and this time I am going for a little more of a masculine look. The reason I change it so much is 1.) because I love every style and want to have them all 2.) to show you how you can up-date or change the feel of your room by re-purposing things you already have in your home. You can do these changes by not spending much money if any at all.  I have made our living room look shabby, eclectic, industrial and bohemian as you can see in the below pictures. I needed to change it to something else. My mama and I virtually blended our ideas so it felt like a little bit of her was home with me for the holidays. I shopped our home for pieces, painted random things, glued my fingers together, and drank a lot of coffee. To see the below rooms in more detail, you can find them on the "Home Tour" page. 

Here is a reminder of what our rental barn looked like when we moved in. We converted the master bedroom into our living room.


I wanted our room to be an eclectic blend of vintage, modern, industrial, bohemian, men's smoking lounge, traditional-country-hunting house, and elegant.


I spackled (yes, I said spackled) and painted the fabric deer head from over our kitchen table so it looked as though it was molded from clay. I then mounted it on some foam core board that I had lying around and placed it inside an over-the-top frame. This frame used to be blue and was in our striped hall. I moved the aqua shutters that were on either side of the fireplace to other locations in our home and put the barn door that was over our mantle inside the fireplace, to create a backdrop for the candles. I added winners' cups and etchings to make our space feel a little more traditional. 

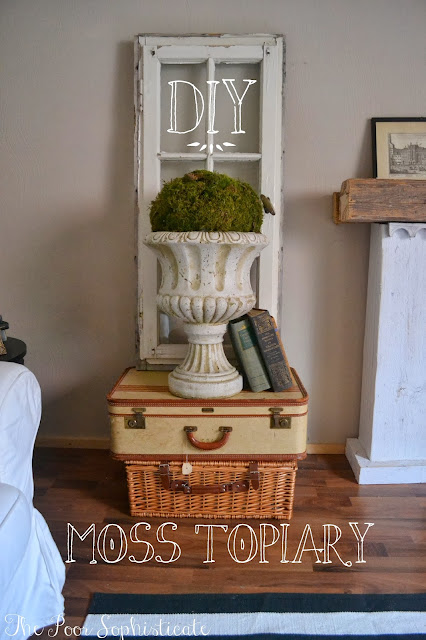
 I ripped apart our dining room arrangement to make the DIY Moss Topiary to the left of the fireplace. It adds a nice splash of freshness. 
Even the suitcases to the left of the fireplace are happy with the new look, they are smiling!
 Our vintage skis, and British picnic basket add to the "traditional-country-home" feel and the ladder which acts as a hanger for blankets is a nice rustic touch!

The modern comes in with the bold patterns in the rug and textiles. I love how unexpected our grey DIY Ombre Drapes look in the room, now.


 The only things I got for this room was this gorgeous vintage, French, red sconce, some WWII Russian ammo boxes (both from European Vintage Chic in Landstuhl), and the supplies to make our DIY Greek Key Chalkboard.


I am pretty "in-love" with these ammo boxes. I will write more about them soon! 

 This fabulously industrial factory cart was picked up from European Country Living earlier this year, and I am just as in love with it today as I was the first day I laid eyes on it. It goes with pretty much any style I do in this room.


 I painted our lampshade black on the outside and gold on the inside to make it look just a little more "sharp". It really suits our new living room!

This slightly new style will go perfectly with what I have planned for this year's Christmas decor!


What in your home can you give new life to today?


Tuesday, November 12, 2013

Quirky and Eclectic Time Zone Clock Wall


Our time zone clock wall has been moved to the striped hall because our map of epic proportions has replaced them in the stairwell! More comping soon! Continue reading for more on our time zone wall!

If you are in the military, a world traveling gypsy or have family in different states or countries you know what it is like to think, "I wonder if it is too late to call (insert name)?". Or maybe you feel like daydreaming about your last trip to Paris (or Detroit if that is what suits you) . I personally love looking at clocks from different time zones and imagining what my family and friends are doing or what other random people in the world are doing...Typically, I look at my clocks and wonder the old fashioned way, then sign on to Facebook and discover they have had a glass of milk for lunch or are craving Taco Bell. 
Most of you have seen those simple time zone clock walls, like the one pictured below, in airports, train stations and some even in some homes. Most are labeled with the name of what time zone the clock is representing. 
 I thought, heck! The clocks that  I have collected happen to represent where we purchased them perfectly and say enough about where the clock is from! We got our California time zone clock as a  gift in (you guessed it) California! The next rusty clock represents Kentucky. It reminds us of old farm equipment. . The next clock, the coo-coo clock, is an obvious representation of Deutschland. I plan on picking up some more clocks from other countries that we travel to that the look represents that country, so we can daydream about our travels there!

I love our eclectic clock wall and am excited to add to it. The only problem with it is,  now if we get homesick and want to talk to family, we can't pretend we didn't know what time it was there (insert wink).

What time zones and style clocks would you have on your wall?


Linking up to:


Monday, November 11, 2013

DIY Transitional Greek Key Chalkboard


Happy Veterans' Day y'all!!! I am so grateful for all of the brave men, women and their families who sacrifice so much for our freedoms... We should never take our veterans for granted...ever. If any of you are reading this post, I am grateful from the bottom of my heart. 

As you all know, I have been making some "transitional" updates to our home. Transitional design is a harmonious blend of both traditional and contemporary design. I especially love seeing traditional form done in contemporary materials or patterns and visa-versa. This DIY, Greek Key chalkboard is a perfect example as being transitional. It is a traditional motif on a simple, non-fussy board.  Because of its clean lines and geometric pattern, many people (nowadays) associate the Greek Key with modern decor.  It is  however, one of the worlds oldest design motifs and was born in ancient China....just kidding, in Greece (obviously). 

I kept this chalkboard super simple and placed it next to an over-the-top, antique, French wall sconce to add contrast. By the way, how fantastically beautiful is this sconce?!?!?! I scored it at European Vintage Chic in Landstuhl, Germany. Before I show you our 1,984th living room re-reveal,  I wanted to take you through some tutorials of how I made it all happen with using 98% of things I already had. The sconce and supplies to make this chalkboard were the only things I purchased. 

While "pinning" I found a tutorial for this fabulous chalkboard on the brilliant blog, Salvage Savvy. I had to make one, too. 
The first thing we did was purchased an inexpensive piece of plywood from our local German hardware store. This pre-cut size happened to fit perfectly in the space we were planning on using it. You could however, make this chalkboard in ANY size you want. Simply adjust your Greek key dimensions based on what looks best on the size of your piece of wood. 
Next, I filled in the natural wood ridges with wood putty, then painted the entire piece white including the sides. My sweet husband helped me mark and tape off the pattern. We used inexpensive painter's tape (we will NEVER do that again, next time we will get a pricier one) that was one inch thick. The outside borders were two inches wide all the way around. 

Once the tape was down, I rolled on some of my homemade chalk paint. You can get the recipe here, or simply use the store-bought kind.
When I removed the tape, this is what happened... ugh.

Because I was being my typical frugal self, I had to spend an hour or so cleaning the lines up which completely cut into my happy hour...NOT COOL! BUY.QUALITY.TAPE. Ok, enough tape preaching. I seasoned my chalkboard by lightly rubbing chalk side ways on it to give it a "worn" look and washed it off with a wet rag. It was now prepped and ready to write on! I found a French love-quote online so I could appear to be "worldly" and Bam, it was done! I am completely pleased with how this corner of our room turned out. I love how swanky it looks at night when the sconce is all lit up! 

And this is how this corner looks through the eyes of a hipster...

Ok, I am off to do some more DIY projects. What are you working on today??


Thursday, November 7, 2013

DIY Moss Topiary


What is up, homies!!?? How are you all doing? Is it getting cold in your part of the world yet? It is brisk, rainy and drab here in Germany.  I have been keeping warm and cozy indoors, sipping homemade eggnog and working on giving our home some much needed updates! All the changes I am making have been done with all items I already have lying around.
In my last post I shared how I wanted to simplify our flower arrangement on our pallet wine bar. The urn and floral combo was far too frilly for me.  I swapped the urn out for a rusty, old olive bucket and love the contrast between the industrial bucket and the elegant flowers. I decided I still wanted to use our urn but, wanted a simple arrangement for it.

After a few minutes of brainstorming I came up with stupid-easy DIY moss ball topiary. Seriously, a four year old could do this... However, I don't recommend letting your four year old use a glue gun.
Not only was it free (or crazy cheap if you don't already have moss), but it only took 15 minutes to make. 

All you do is crumple paper into a large sphere-ish (notice the ish...it doesn't have to be perfect) figure than wrap masking tape on it to keep the edges down. 

After you put together your cruddy looking ball you just hot glue moss on it. Simple as that! I only did the top part that is sticking out of the urn because I didn't want to waste moss on a part of the ball that won't even be seen. 

Voila!

So what do you think of my ball??
 I can't wait to show you the rest of the changes I have made to give our barn a new "look" using only items we already have! 
What are you working on today?


Tuesday, November 5, 2013

Less Fluff, More Rust


Howdy there, daaaaaaarlings!  I have been trying to slowly make some changes to our home... If I had to put a name on it, it would be a big eclectic, bohemian blend of transitional, industrial, and vintage finds. With that being said, I started to feel like my large urn on the pallet bar was looking a little fluffy and femme. As you all know, I am obsessed with contrast. Mixing old with new, pretty with rusty etc, etc  and this piece was just waaay too pretty. It had to be changed immediately. Instead of getting rid of our super frilly arrangement,  I decided to create two arrangements. One of them is industrial and a nice contrast to the white flowers and the other (which I still have to create), will be simple and made of only moss like in the pictures below. I am unsure if I am going to paint the urn black or not.


The new industrial arrangement on our pallet bar is a bit funkier and goes nicely with my new DIY zebra hide rug and giant, vintage map. I enjoy the combination of textures and materials. 
By simply swapping the urn with an old rusty olive bucket, I was able to completely change the look of the arrangement.
I am happy with the changes I am making and can't wait to work on the moss arrangment!

Sometimes all it takes is looking at something a little differently and a minute to swap things in and out. How often do you change your style around??? I live, sleep, breathe, eat (mostly eat) design, so I like to change the look of our home frequently. 

Off to work on some other fun changes! Can't wait to share them with you!
To see what we did with the urn, click here!


Related Posts Plugin for WordPress, Blogger...